Kugelfischer rebuild
Fixing a Kugelfischer injection system on a Flavia is a workable, but not so easy task. There is little centralized documentation, and while all the parts and pieces can (sort of) be put together, it requires some skill in a couple of different areas. Its not as simple as rebuilding the pump and just putting it on. Rather, there are three different stages to a KF improvement project. These include:
None of these is particularly difficult, but each takes patience, and careful working through the problems and difficulties. The purpose of this writeup is to give an overall outline, and make this a bit more clear and straightforward.
Resources provided include:
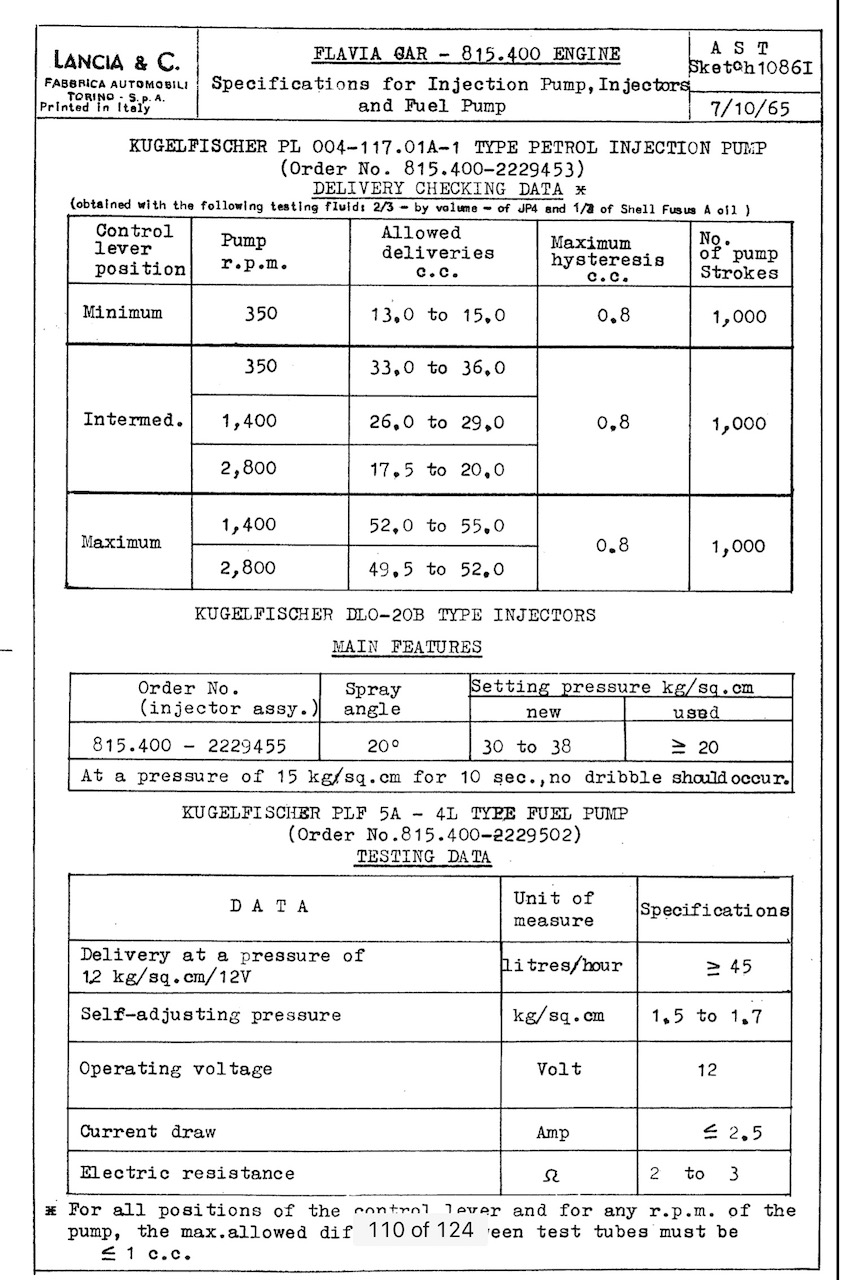
- Lancia AST 1086 - specifications for earlier injection system, 815.400
- Lancia AST 1505 - update sheet of specifications for 2 liter system - see below.
- Lancia AST 1261 - sketch for improvements to enrichment device (for the earlier pumps) - see below
- supplement to Flavia 2000 Owners Manual for injection.
- Omicron's excellent summary on Kugelfischer injection for the 1.8 and 2 liter engines.
- Lancia workshop manual for injection (mostly 815.400).
So here are some details on each of these steps:
1. Accumulate knowledge and information; get parts
For the first stage, contact was established with many KF friendly Lancista around the world - the two most helpful were Bert Ewalds in Holland and Andrew Cliffe of Omicron in England. Also Florent Bidet in France. From them we learned how and where to get parts (largely from Peugeot Classic in France), intricacies of rebuilding, including gasket patterns (very much thanks to Bert) and data/differences between 1.8 and 2.0 injection (Andrew did a detailed analysis of this, uploaded below). Bert's knowledge of the system and his guidance throughout this process was invaluable. Also helping was the inimitable Michael Kristick - who had a complete 2.0 injection system taken off another coupe years ago in New England. While been sitting for some years (maybe even 20), it was relatively clean and unmessed with. Mike also came up with a small Lancia rebuilding kit with some seals and washers.
We also learned of all the tools to be used, both from Bert and Colin Clamp (English Flavia Consortium, he also had all manuals). Most tools we remade locally, but there were a couple that we were able to get - or get the measurement, especially the important one to set the correct distances for linkages. Throughout this, we learned that Lancia made (and documented well) their use of two different injection pump versions - one for the 1.8 liter cars, another for the 2.0 liter. There were about 3500 of the first type, and only about 700 of the second.
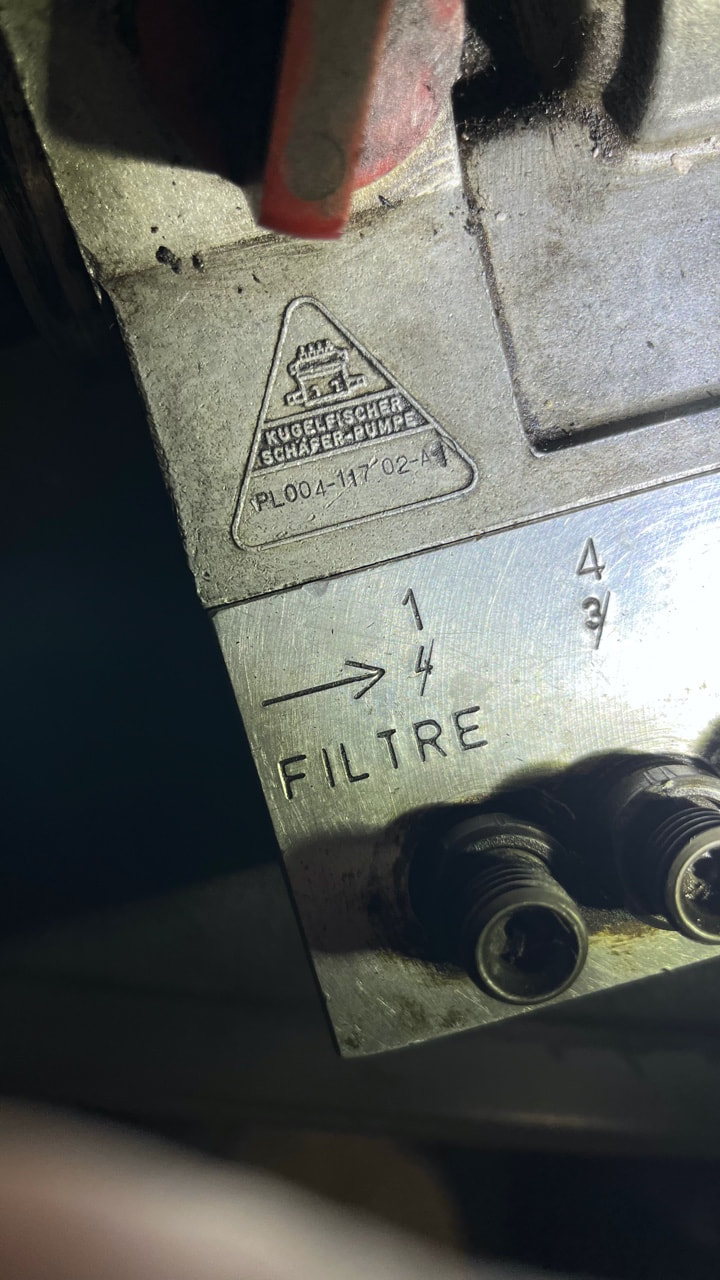
The KF number for the 1.8 liter pump is PL004-117- 01A-1, and for the 2 liter pump its PL004-117-02 A2.There is a fitting issue with the 2 liter cars and pump around the starter. Some dimension changed with the larger motor, and this can be seen in the pump cover bolts needing clearance. While two different pumps were documented, we actually found my car had a third, strange in-between pump, looked like a 1.8 liter pump, revised to fit an (early?) 2 liter engine. It had a number PL004-117- 02-A, with a cutout to fit the starter, and also a modified long bolt. All was simplified in the later 02 A2 pump listed in the Lancia documentation for the 2 liter engine. We chose to use the later pump that we received from Kristick.
Check the number on yours and make sure its the right one. I can help you with that, but you have to take a picture of the number stampings on the pump top. Luckily, with the complete system from Mike, we were able to use the later, documented pump, and assemble all good 2.0 liter pieces.
2. Rebuild the pump
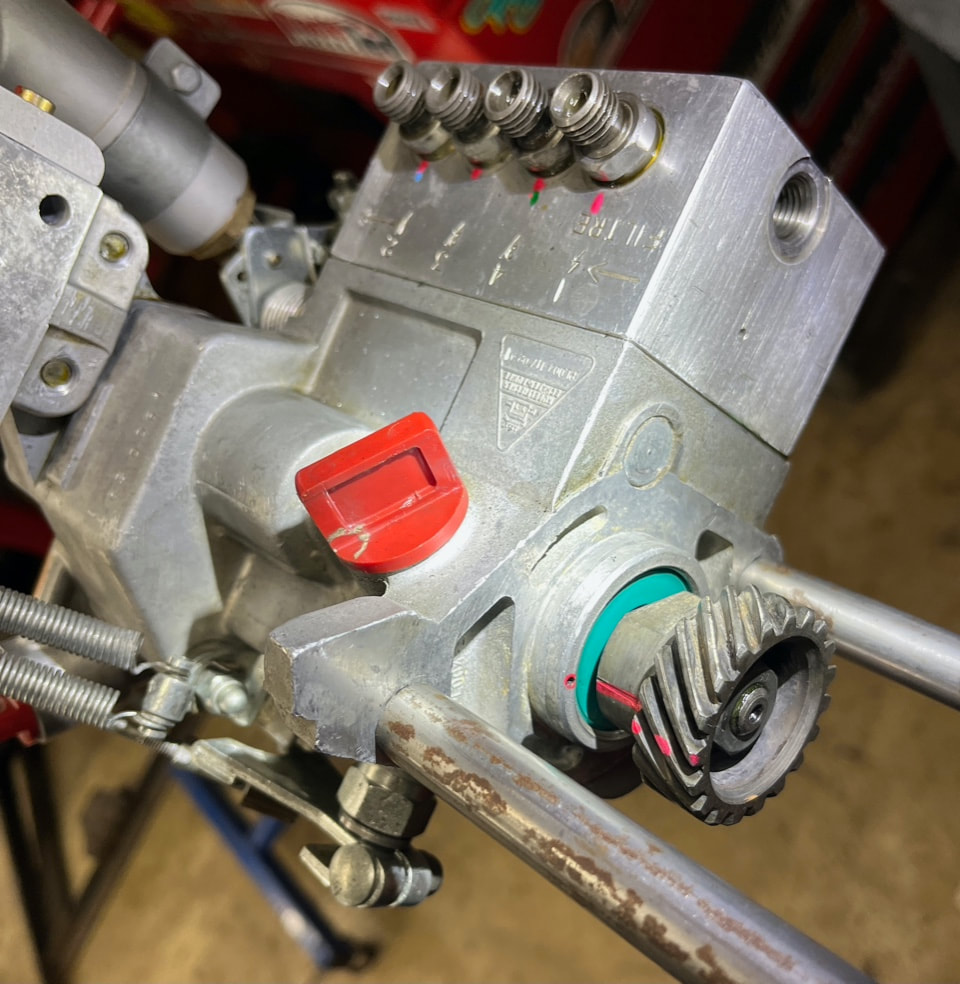
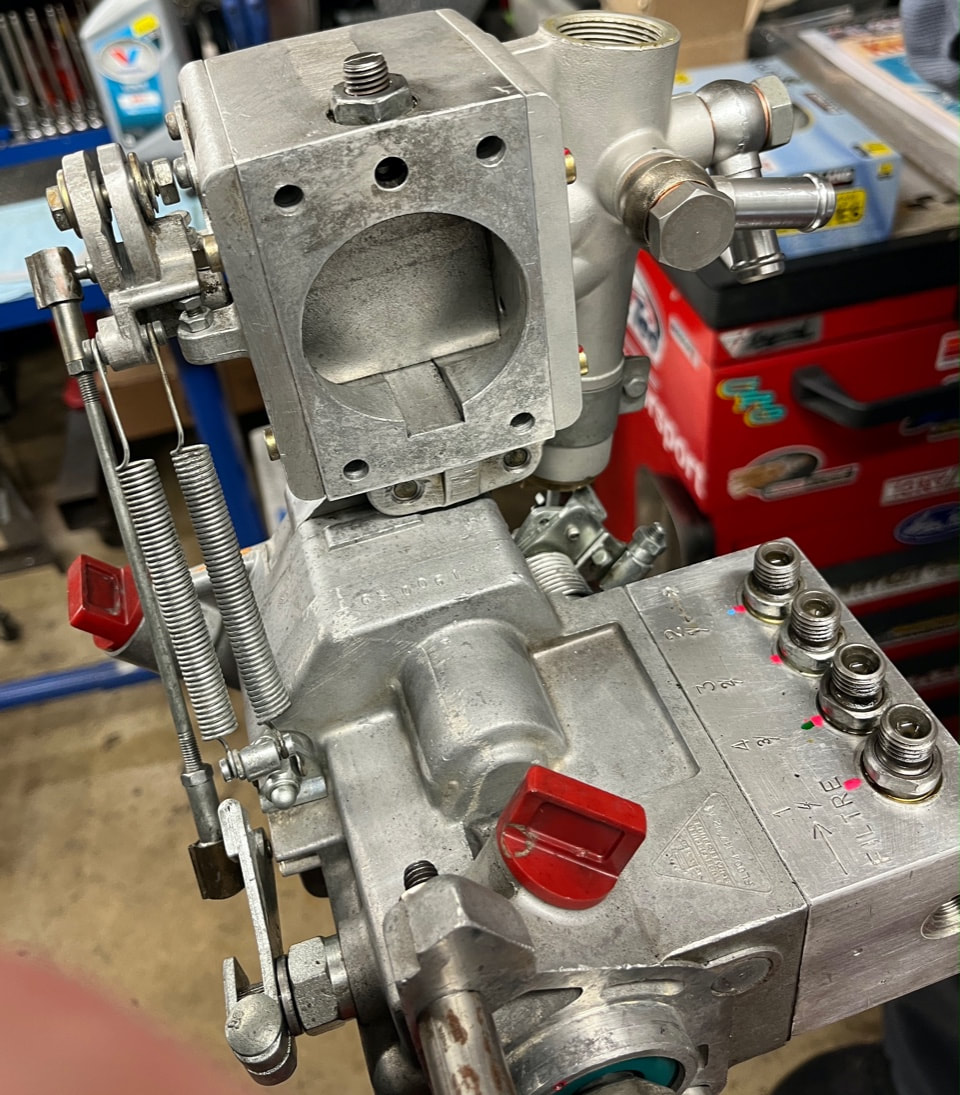
In the rebuilding stage - Giovanni undertook to take the pump apart. He found the 2.0 pump we chose to use was in good shape, little wear or dirt inside. We chose not to send it out for rebuilding and recalibration, and decided to take the risk and rebuild it ourselves. This saved time and some money, but in doing this, gave up any measured calibration of the outputs to each cylinder. It was a risk we chose to take.
There were essentially three parts to the rebuilding:
For the rebuilding, we used a very detailed French magazine publication on rebuilding Kugelfischer pumps - which , while for Peugeout, was full of detailed, step by step photos, over 200 of them. Very easy to use. We also found that some of the internal O ring seals from Peugeot didn’t work as well as the vintage Lancia ones we got from Kristick. The Lancia ones seemed just a wee bit smaller and a different durometer. Ignoring any awareness of how old they were, they worked just fine. Careful inspection of the injectors yielded four good ones…. the ones that were originally on the car were a mixture of the 1.8 and 2.0 types, which was odd, but had worked seemingly fine. Getting four working 2.0 liter ones, in decent shape, should be an improvement.
3. Fitting to the car, fettling
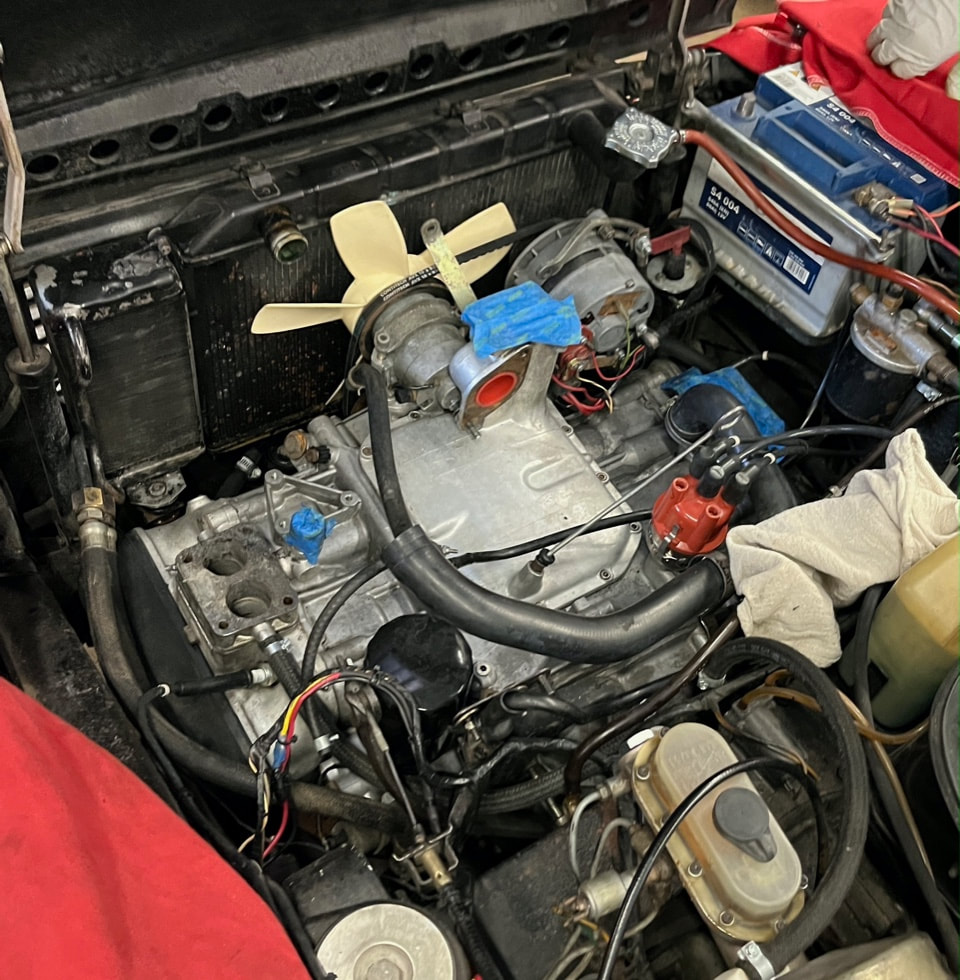
Fitting the rebuilt pump to the car required some detailed attention. The setup has to be done just right, and all the working bits free to move as they should. Coming from the world of carburetors, I assumed once it was bolted on, it would work just fine. It turned out to need a couple of visits for fine tuning, looking for leaks, easing some linkages, minor adjustments for air flow control. Initially it was a little disappointing, but Bert Ewalds said that when he did his, it took about 500 miles for it to settle down, and the same has been the case here. It probably has to do with some small air bubbles working their way out of the system.
Also, fitting electronic ignition was a great help - both at lower RPM (more torque from accurate timed spark), but also at higher RPM. It feels like a 10% improvement over the traditional points, which some suggest don’t work as well as they used to with lesser quality in the reproduced parts. (Note: we also had a problem with the fixed ignition advance: the manual says 2 deg, or 3 deg, but we oddly found that 10 deg worked much better. It might have to do with someone fitting the timing chain a bit off years ago). We had some issues with electrical gremlins, and found the alternator was not up to snuff, and inadequate power to the coil - so pay attention to all the systems. At one point, we went back to traditional points for simplification, and then once sorted out, back to electronic ignition which gives a much better advance curve and more power.
We found a number of air leaks in the four rubber hoses, and ultimately replaced all of them with ones from a Fiat X1/9 that fit well.
With everything that was done, the car is now running well. Starting is now much easier with electronic ignition, but its always a bit lumpy for the first few minutes. You think its running like a disaster, but once it warms up, the car runs well. There is an issue with the enrichment device not working correctly when the car is warmed up (not uncommon, also was the case with Spica systems on Alfas), so a manual switch to disengage it was fitted, to be used when the car is warm.
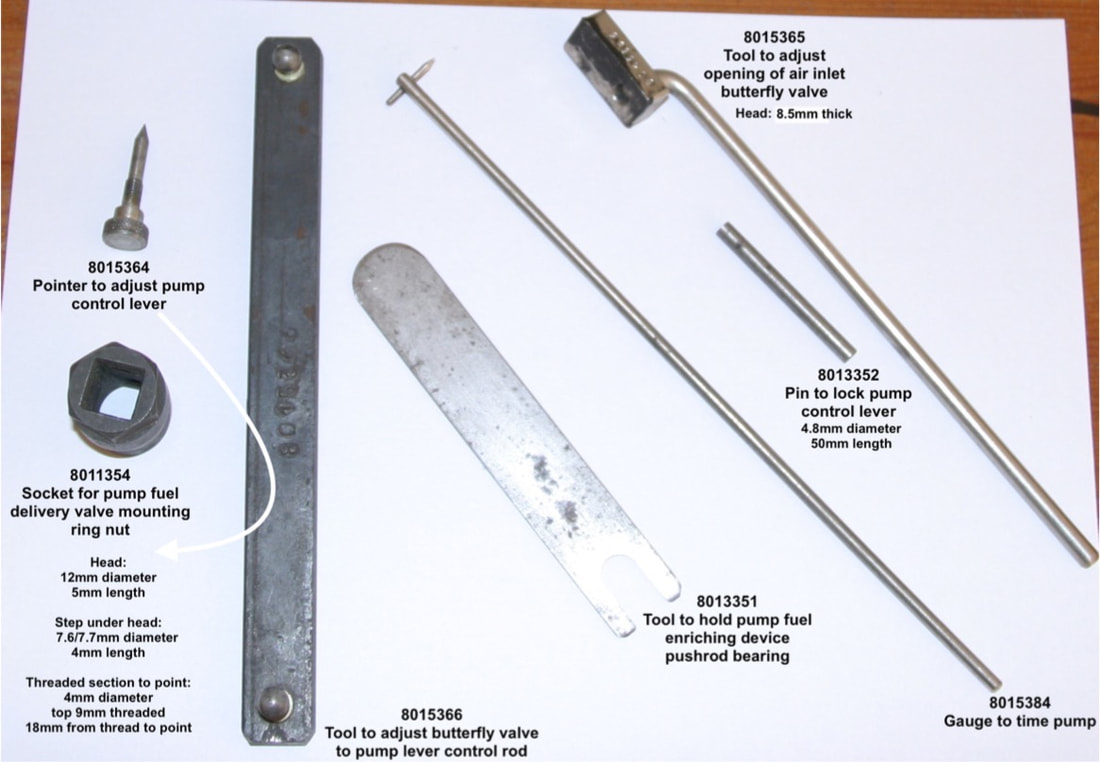
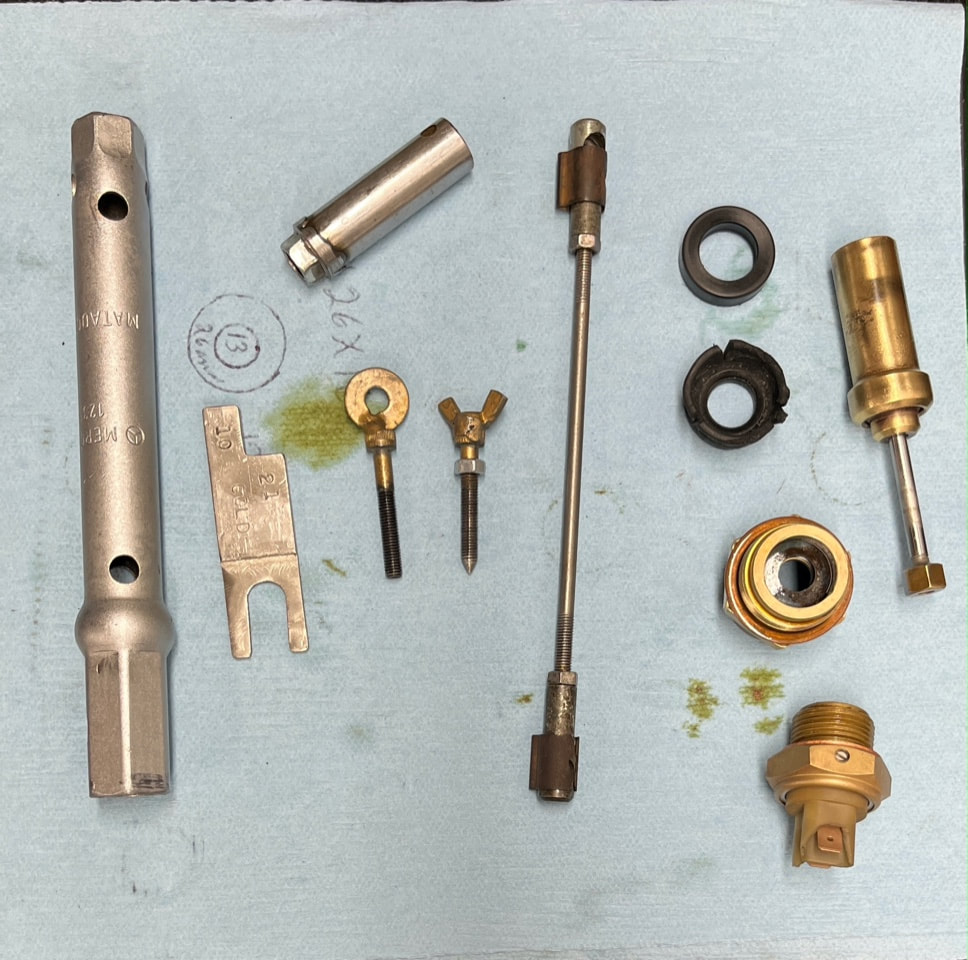
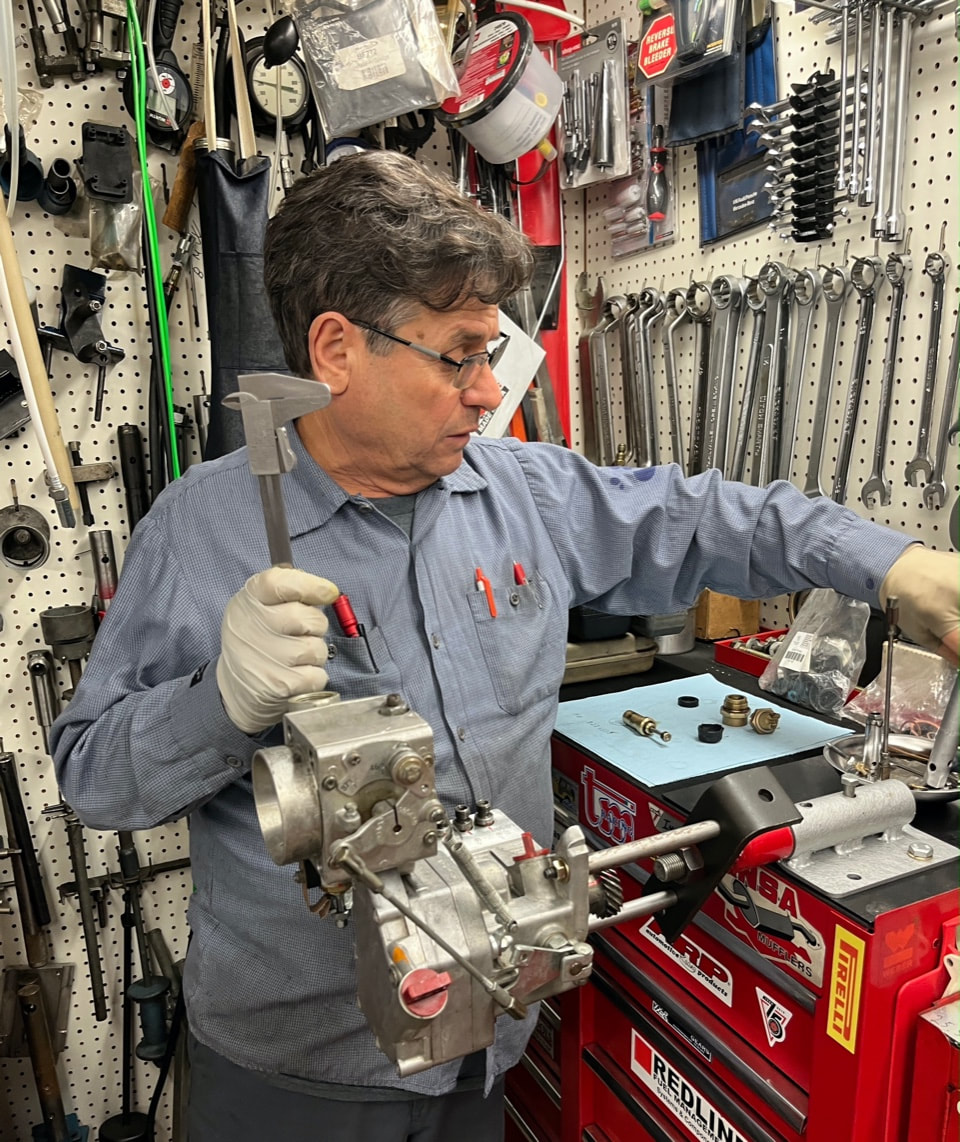
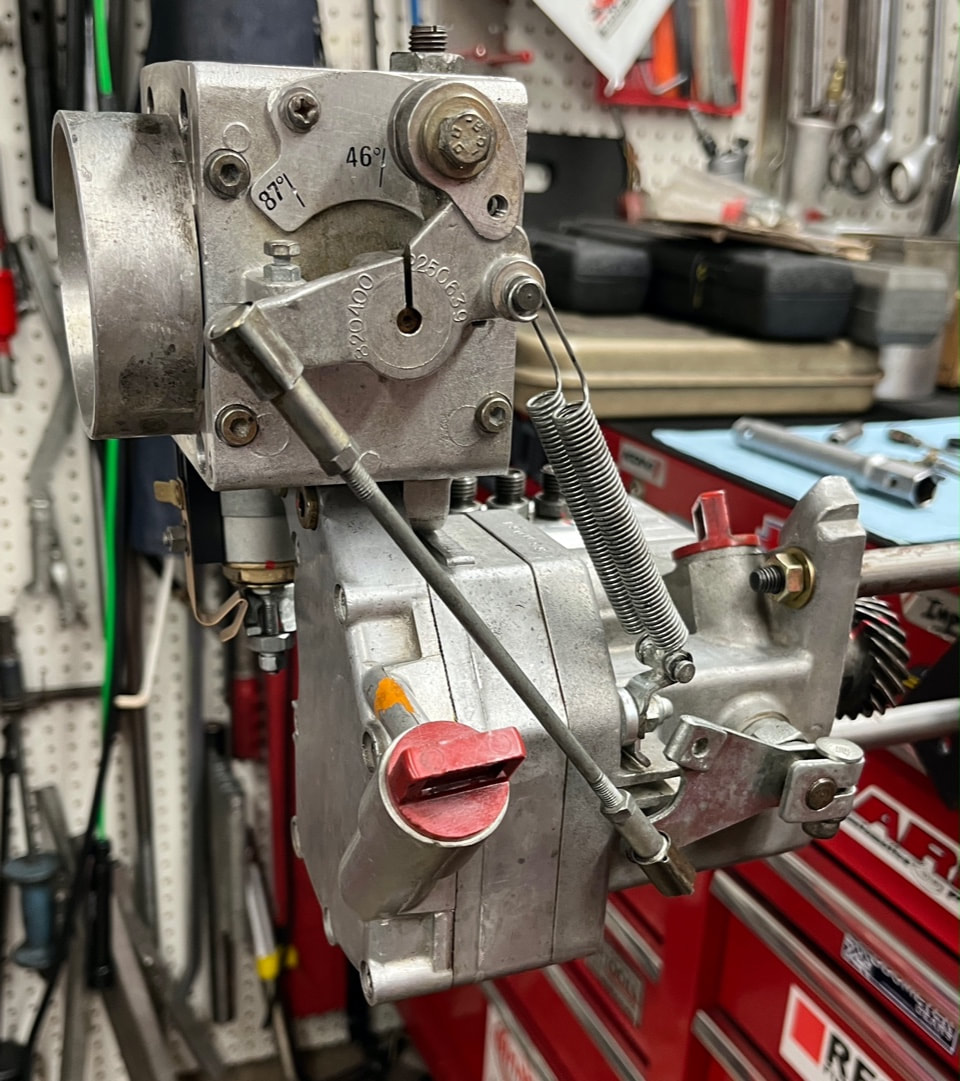
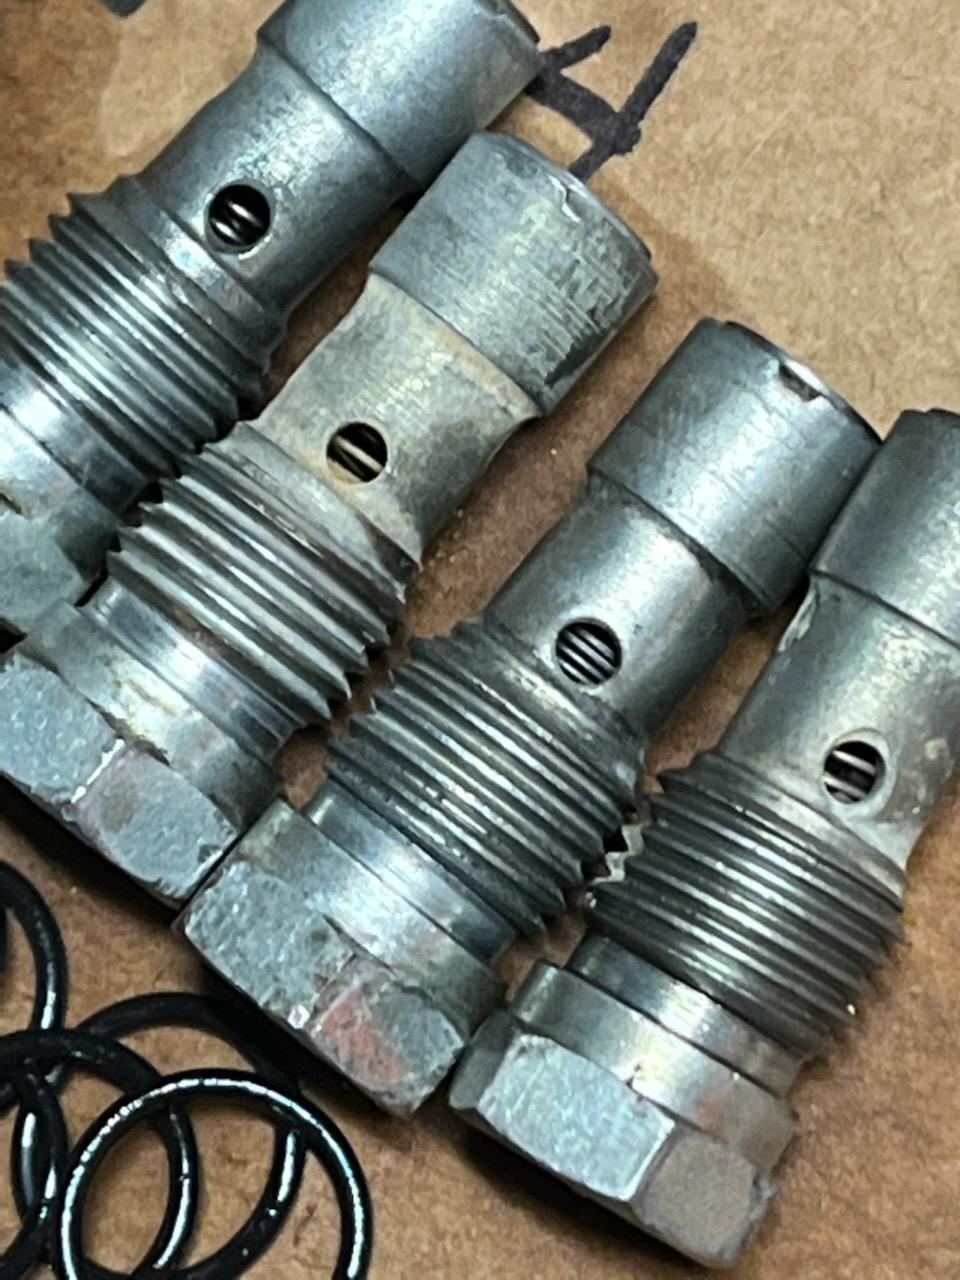
In the photos below, first is a shot of all the setup tools to be used for the KF injection. However, many of these are not available, and had to be made (see shot no. 2, and Giovanni working in shot 3). The main important one is 8015366, which is 173mm between CL of end posts, used for calibrating (see shot 4). Shown in shots 5,6 are the internal check valves (sort of small internal injectors). These were mismatched in my car between 1.8 and 2.0 liter sizes, and also needed the correct O rings (shot 7). The newer Peugeot ones were larger, on the left; the older Lancia ones were smaller and worked better.
The injectors are listed as DLO20B, no longer easily available. They can be rebuilt; using a DLO20D (still avail, Peugeot) as the internal components are common. We simply did a mix and match among the eight injectors to find four good ones. Ideally we should send in the other four to be redone - I think one of the sources has remade the little internal springs for them.
- accumulate knowledge and information; get parts
- rebuild the pump
- fitting to the car, fettling
None of these is particularly difficult, but each takes patience, and careful working through the problems and difficulties. The purpose of this writeup is to give an overall outline, and make this a bit more clear and straightforward.
Resources provided include:
- Lancia AST 1086 - specifications for earlier injection system, 815.400
- Lancia AST 1505 - update sheet of specifications for 2 liter system - see below.
- Lancia AST 1261 - sketch for improvements to enrichment device (for the earlier pumps) - see below
- supplement to Flavia 2000 Owners Manual for injection.
- Omicron's excellent summary on Kugelfischer injection for the 1.8 and 2 liter engines.
- Lancia workshop manual for injection (mostly 815.400).
So here are some details on each of these steps:
1. Accumulate knowledge and information; get parts
For the first stage, contact was established with many KF friendly Lancista around the world - the two most helpful were Bert Ewalds in Holland and Andrew Cliffe of Omicron in England. Also Florent Bidet in France. From them we learned how and where to get parts (largely from Peugeot Classic in France), intricacies of rebuilding, including gasket patterns (very much thanks to Bert) and data/differences between 1.8 and 2.0 injection (Andrew did a detailed analysis of this, uploaded below). Bert's knowledge of the system and his guidance throughout this process was invaluable. Also helping was the inimitable Michael Kristick - who had a complete 2.0 injection system taken off another coupe years ago in New England. While been sitting for some years (maybe even 20), it was relatively clean and unmessed with. Mike also came up with a small Lancia rebuilding kit with some seals and washers.
We also learned of all the tools to be used, both from Bert and Colin Clamp (English Flavia Consortium, he also had all manuals). Most tools we remade locally, but there were a couple that we were able to get - or get the measurement, especially the important one to set the correct distances for linkages. Throughout this, we learned that Lancia made (and documented well) their use of two different injection pump versions - one for the 1.8 liter cars, another for the 2.0 liter. There were about 3500 of the first type, and only about 700 of the second.
The KF number for the 1.8 liter pump is PL004-117- 01A-1, and for the 2 liter pump its PL004-117-02 A2.There is a fitting issue with the 2 liter cars and pump around the starter. Some dimension changed with the larger motor, and this can be seen in the pump cover bolts needing clearance. While two different pumps were documented, we actually found my car had a third, strange in-between pump, looked like a 1.8 liter pump, revised to fit an (early?) 2 liter engine. It had a number PL004-117- 02-A, with a cutout to fit the starter, and also a modified long bolt. All was simplified in the later 02 A2 pump listed in the Lancia documentation for the 2 liter engine. We chose to use the later pump that we received from Kristick.
Check the number on yours and make sure its the right one. I can help you with that, but you have to take a picture of the number stampings on the pump top. Luckily, with the complete system from Mike, we were able to use the later, documented pump, and assemble all good 2.0 liter pieces.
2. Rebuild the pump
In the rebuilding stage - Giovanni undertook to take the pump apart. He found the 2.0 pump we chose to use was in good shape, little wear or dirt inside. We chose not to send it out for rebuilding and recalibration, and decided to take the risk and rebuild it ourselves. This saved time and some money, but in doing this, gave up any measured calibration of the outputs to each cylinder. It was a risk we chose to take.
There were essentially three parts to the rebuilding:
- The deepest part, the interior of the pump where the governer ridees on the 3D cam, remained untouched, but was simply cleaned.
- The next part were the pump internals, where the governor directs fuel to the diffferent cylinders with four cylinders and seals, and also four valves. These required the most work to get right.
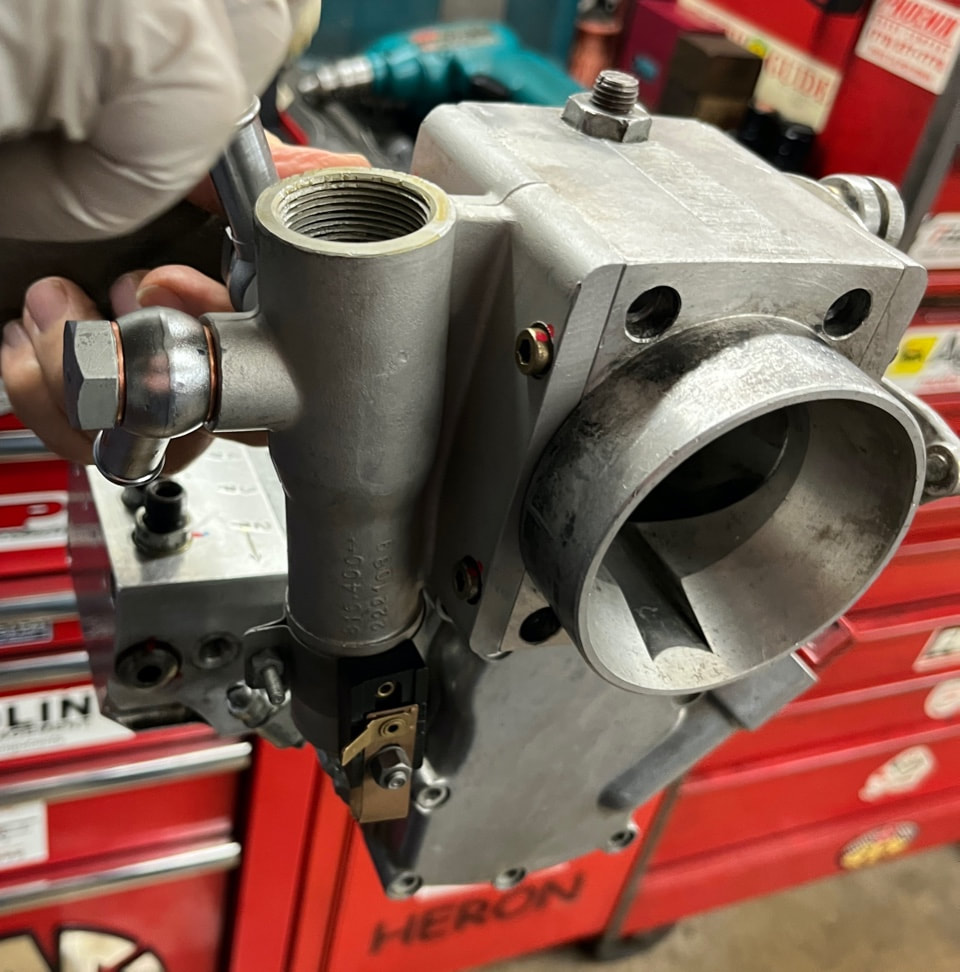
- Last were all the ancillary conditions around the pump, including enrichment device, linkages, and air passages. These also required tending and careful reworking. We were able to install a good working thermostat for the enrichment device.
For the rebuilding, we used a very detailed French magazine publication on rebuilding Kugelfischer pumps - which , while for Peugeout, was full of detailed, step by step photos, over 200 of them. Very easy to use. We also found that some of the internal O ring seals from Peugeot didn’t work as well as the vintage Lancia ones we got from Kristick. The Lancia ones seemed just a wee bit smaller and a different durometer. Ignoring any awareness of how old they were, they worked just fine. Careful inspection of the injectors yielded four good ones…. the ones that were originally on the car were a mixture of the 1.8 and 2.0 types, which was odd, but had worked seemingly fine. Getting four working 2.0 liter ones, in decent shape, should be an improvement.
3. Fitting to the car, fettling
Fitting the rebuilt pump to the car required some detailed attention. The setup has to be done just right, and all the working bits free to move as they should. Coming from the world of carburetors, I assumed once it was bolted on, it would work just fine. It turned out to need a couple of visits for fine tuning, looking for leaks, easing some linkages, minor adjustments for air flow control. Initially it was a little disappointing, but Bert Ewalds said that when he did his, it took about 500 miles for it to settle down, and the same has been the case here. It probably has to do with some small air bubbles working their way out of the system.
Also, fitting electronic ignition was a great help - both at lower RPM (more torque from accurate timed spark), but also at higher RPM. It feels like a 10% improvement over the traditional points, which some suggest don’t work as well as they used to with lesser quality in the reproduced parts. (Note: we also had a problem with the fixed ignition advance: the manual says 2 deg, or 3 deg, but we oddly found that 10 deg worked much better. It might have to do with someone fitting the timing chain a bit off years ago). We had some issues with electrical gremlins, and found the alternator was not up to snuff, and inadequate power to the coil - so pay attention to all the systems. At one point, we went back to traditional points for simplification, and then once sorted out, back to electronic ignition which gives a much better advance curve and more power.
We found a number of air leaks in the four rubber hoses, and ultimately replaced all of them with ones from a Fiat X1/9 that fit well.
With everything that was done, the car is now running well. Starting is now much easier with electronic ignition, but its always a bit lumpy for the first few minutes. You think its running like a disaster, but once it warms up, the car runs well. There is an issue with the enrichment device not working correctly when the car is warmed up (not uncommon, also was the case with Spica systems on Alfas), so a manual switch to disengage it was fitted, to be used when the car is warm.
In the photos below, first is a shot of all the setup tools to be used for the KF injection. However, many of these are not available, and had to be made (see shot no. 2, and Giovanni working in shot 3). The main important one is 8015366, which is 173mm between CL of end posts, used for calibrating (see shot 4). Shown in shots 5,6 are the internal check valves (sort of small internal injectors). These were mismatched in my car between 1.8 and 2.0 liter sizes, and also needed the correct O rings (shot 7). The newer Peugeot ones were larger, on the left; the older Lancia ones were smaller and worked better.
The injectors are listed as DLO20B, no longer easily available. They can be rebuilt; using a DLO20D (still avail, Peugeot) as the internal components are common. We simply did a mix and match among the eight injectors to find four good ones. Ideally we should send in the other four to be redone - I think one of the sources has remade the little internal springs for them.


|
| ||||||||
|
| ||||
Additional information:
The French magazine, an excellent issue with heaps of step-by-step photos on rebuilding the pump can be found here:
Livre Automobile - Rénovation d'une pompe d'injection indirecte Kugelfischer - Boutique Larivière
https://boutiquelariviere.fr/site/lariviere/default__lariv.33810.56119__/fr/kiosque/produit.html
For the Peugeot rebuild kit for the KF, contact Peugeot Classique at:
<pr.classic@pieces-de-rechange-classic.com> or <neoretroclassic@mpsa.com>
Florent Bidet had a conversation with Deleplace, familiar with the injection on Peugeot who gave the following info:
Injectors :
- No longer available, almost impossible to find
- The only difference between DLO20B (original type) and DLO20D (current type) is the connection fitting with the tubes.
- So a DLO20D is suitable to repair a DLO20B if needed, internal components are common.
- They bench test injectors, check jet size, shape, pressure, leaks.
- Injectors that have not been stopped for decades are usually ok, the ones not stocked in oily liquid are usually seized or have internal oxydation with leaks or a bad jet
Thermostatic cartridge :
- Easy to test blowing hot air on it with a heat gun (blowing air on the cartridge the lever should move down)
- Hardly fails, very reliable
- check if it is the same as the Peugeot 404 one (should be in his opinion but not 100% sure), if so, available for 200 euros
Gaskets :
- Not available : they have the necessary gaskets for the pumps they are overhauling in their workshop but not selling them as spares.
(note: drawings for these are available from Bert, and are listed above)
Deleplace operation:
They are used to working on these - control, repair, reseal, adjust pump and injectors for customers all over the world so no problem to send them your pump+injectors (no need to send the tubes), just emptying the oil in the pump for transport and they send it back ready to install on the car which should then run perfectly !
Cost of the operation is 1200 euros (forgot to ask for leadtime, sorry for that) and they are used to work with UPS for international shipping. They can communicate in English via email but obviously I would help on that point if necessary.
air leaks:
The guy told me the system is very sensitive to air leaks and the hoses on the inlet manifold are usually cracked if originals or worn if aftermarket ones (Cavalitto sold me bad quality ones years ago, they were worn after 2 years on the car, nothing to compare with the original quality). They use silicons ones on the cars they repair although his comment was that the silicon ones are not thick enough and tend to schrink when accelerating, not perfect but not a problem neither, he was just wishing some thicker silicon hoses could exist. A test trick he gave me : they spray some brake cleaner on the hoses while engine is at idle, if engine revs up, there's a leak.